Do you want to know how to create a WooCommerce custom product layout using the ProductX plugin? If yes, then you’ve come to the right place.
These days, one of the most critical needs of WooCommerce websites is to easily create and customize the product page layouts. So that you can display your products in a visually appealing way. Consequently, this grabs the attention of your customers to explore your products.
So, in this post, we’ll show you the detailed steps to create a WooCommerce custom product layout for your WordPress WooCommerce website.
Let’s dive in!
What is ProductX Plugin?
ProductX is a Gutenberg product block plugin that provides additional product blocks for sophisticated WooCommerce stores. This plugin enhances the aesthetics of your WooCommerce product pages and ultimately your entire website.
It comes with a variety of product blocks for your WooCommerce product layouts. Such as product listing, slider, category listing, carousel, and so on.

Also, it offers a ton of cool features including a quick view, product comparison, image flipping, wishlist, and many more. You can also show your latest products, best-selling products, on-sale products, featured products, category products, and so on.
Moreover, you’ve complete control over how you create your custom product layout. You can arrange your products in either elegant grids or a list. Also, if you don’t like the plain layout, then you can consider using product sliders. That’s something you can do by simply using the blocks.
Further, it includes ready-to-use pre-made starter templates and blocks. This allows you to quickly create a new product page without having to start from scratch. Or else, you can always start from the ground up and design your own product layout. That you can further save it for later use.
To be familiar with this plugin, let’s take a closer look at the features:
Key Features of ProductX:
- It comes with an advanced query builder that allows you to display your products in a custom query.
- You can use several criteria to display products, such as category, tag, order, exclusion, offset, and so on.
- There are a number of grid types and blocks to choose from, as well as lots of customization options for applying your design in the grid blocks.
- Use the Ajax filter to quickly view content because it shows multiple products at a time.
- The pagination and “load more” features of post lists and post grids make it simple to navigate products.
- Enable the sales status features that inform customers about the current status of your products.
- Allows you to see the current stock status of your products in a grid format.
Pricing:
ProductX is a freemium plugin. Therefore, you can download the free version of this plugin directly to your dashboard from the WordPress.org directory. Or, from its official site as well. Also, you can install the plugin right from your WordPress dashboard.
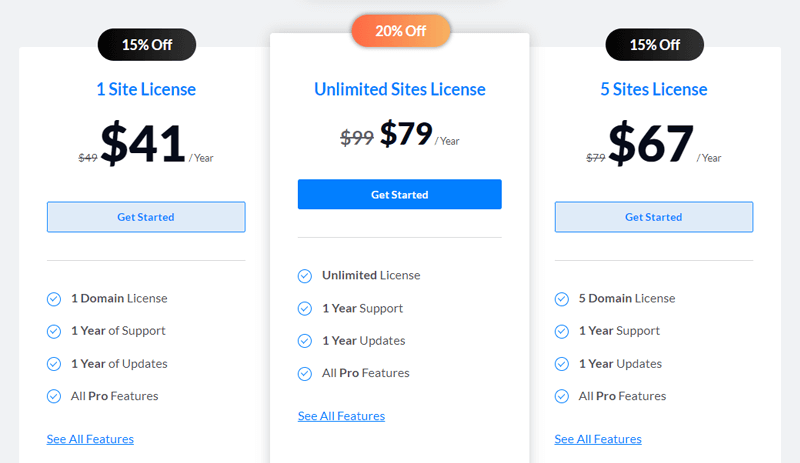
There is also an option to upgrade to its premium version for additional features where the pricing plans are:
- 1 Site License Plan: $49/year. Includes 1 domain license, 1 year of support and updates, and all pro features.
- 5 Sites License Plan: $79/year. Includes 5 domain licenses and all features of the 1 Site License Plan.
- Unlimited Sites License Plan: $99/year. Includes unlimited license and all features of the 5 Site License Plan.
Why Would You Want to Create WooCommerce Shop Page Layouts?
First of all, shop pages are the most significant aspects of your eCommerce store. It not only informs your customers about your products but tempts them to buy from you.
A flawless product page provides a plethora of advantages to your store. Therefore, you must be cautious while creating and handling the product page.
So, before getting into the steps to create a WooCommerce custom product layout, let’s discuss the reasons for it.
- Attract Customer: Creating a compelling product page makes customers pay close attention to price, description ratings, and reviews of a product. They rely on that information before purchasing. Hence, a stunning product page attracts customers.
- Build Your Brand: Undoubtedly, the shop page generates more sales and is the window to your WooCommerce store’s brand value. The way you display products, how it’s the best in the market, etc. Thus, these factors help to strengthen the brand value of your store.
- SEO Advantages: WooCommerce site also requires adequate traffic to generate money. Thus, the more visitors, the more chances to sell your products. For that, the product pages bring in more customers, which helps with your SEO and improves rankings.
Further, we have already discussed the features of the ProductX plugin. So, let us move forward into the steps to create a WooCommerce custom product layout.
How to Create WooCommerce Shop Page Layouts with ProductX?
You can create a WooCommerce custom product layout with really simple steps. So, let us give you the overview of the steps before moving on to our detailed tutorial session:
- Step 1: Install and Activate the ProductX Plugin
- Step 2: Creating WooCommerce Shop Page with ProductX
- Step 3: Customizing the Shop Page using ProductX Blocks
- Step 4: Preview the Shop Page
Now, come along with us on this ride.
Step 1: Install and Activate the ProductX Plugin
Just like any other WordPress plugins, you can get started with ProductX by simply installing it on WordPress. The installation process is way more simple.
To let you know, you must have installed the free version of ProductX to use its premium version. So, at first, we’ll show you how to install the free version, then we’ll move to the premium version.
1. Install and Activate the Free Version of the ProductX Plugin
First, log in to your admin dashboard and navigate the Plugins and click on Add New option.

Now, you’ll be redirected to the plugins page where you can see a list of plugins, recommended by WordPress. There, search for ProductX in the search bar.
Once you see the ProdutX plugin, all you need to do is click on the Install Now button next to it.

After that, make sure to click on the Activate button as well.

Hence, you’ve successfully installed the free version of the ProductX plugin.
2. Configure the ProductX Plugin
Here, you can configure some of the settings. There are some General Settings and other add-on settings like compare, flip image, and so on.

However, you can change these elements according to your requirements. Finally after making any changes, just click on the Save Changes button to save them.
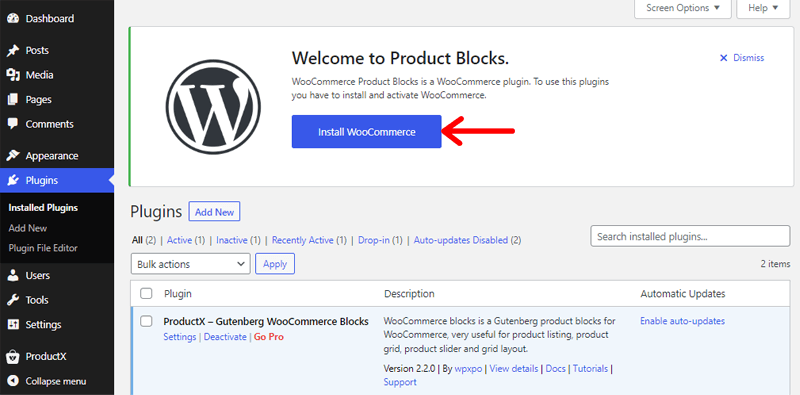
Further, the ProductX plugin is a WooCommerce extension plugin. That is, it extends the functionality of WooCommerce by providing various required blocks. To use the ProductX plugin, make sure you have the WooCommerce plugins installed beforehand.
You might also receive a notification on your dashboard if you haven’t installed it previously. To do so, simply select the ‘Install WooCommerce’ option. And, activate and set up your WooCommerce store as well.
3. Purchase Pro Version of ProductX
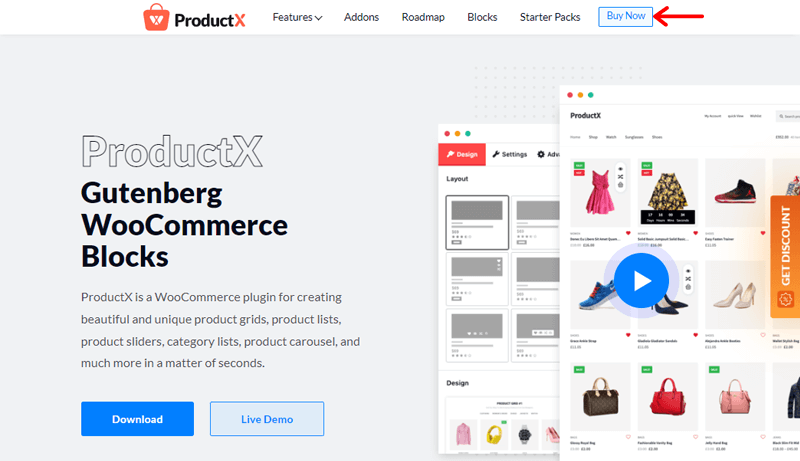
For the pro version, you’ll need to purchase the premium ProductX which is available on the WPXPO’s official website.
Then, just click on the Buy Now button from the navigation bar.
After that, you can see different pricing packages available. Simply, select the one that suits your need and click on the Get Started button.
Following that, it’ll redirect you to a new checkout page. There, you’ll need to fill in all the details and create an account. You can also use the coupon code if you’ve any for the discount purpose.
Once you’ve filled in all the details, click the Purchase button.
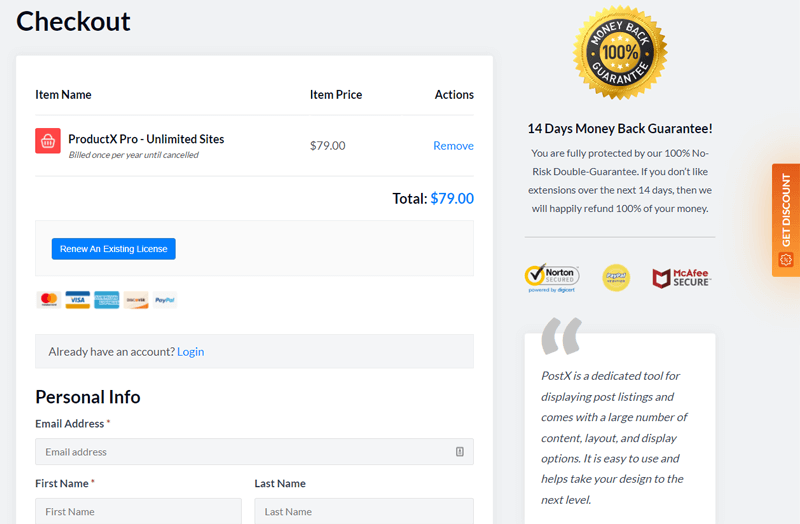
After successfully purchasing the ProductX pro, the download link and license key are sent in your email. From there, you can download the ZIP file of premium ProductX and hold the license key for later use.
4. Upload, Install and Activate the ProductX Pro Plugin
The ProductX pro installation process differs slightly from that of the free version. Because premium plugins aren’t accessible from the dashboard as they are not available through the WordPress plugin directory.
Previously, we downloaded the plugin from WPXPO’s official website. The first few steps are similar to the earlier one.
To begin, log in to your WordPress dashboard. After that, navigate to the Plugins menu and click on the Add New.
Next, click on the Upload Plugin button and then Choose File. After that, upload the downloaded ZIP ProductX file to this place and click on the Install Now button next to it.
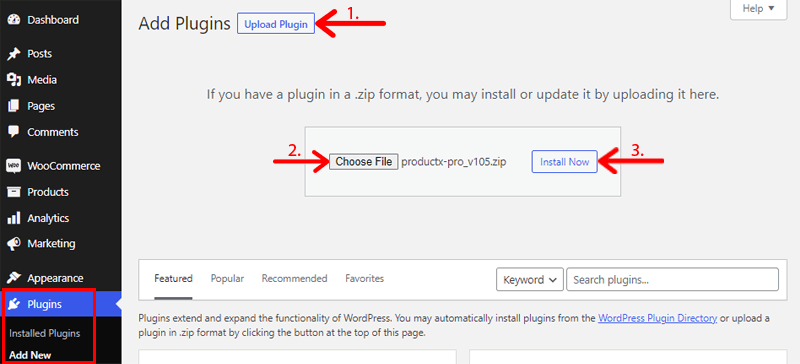
Following that, you can see the Activate button. Just click on it!

Afterward, you’ll be directed to the license key page. There, you need to enter the license key you’ve previously received in your mail.
Now, enter the license key in the License key box and click on the Check and Save License button.
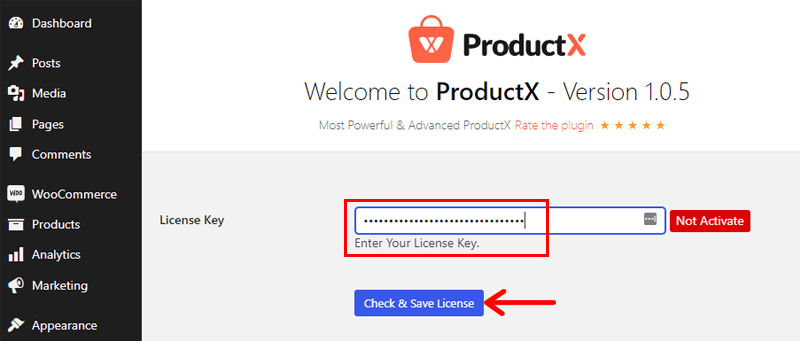
Finally, you’ve successfully installed and activated the ProductX pro.
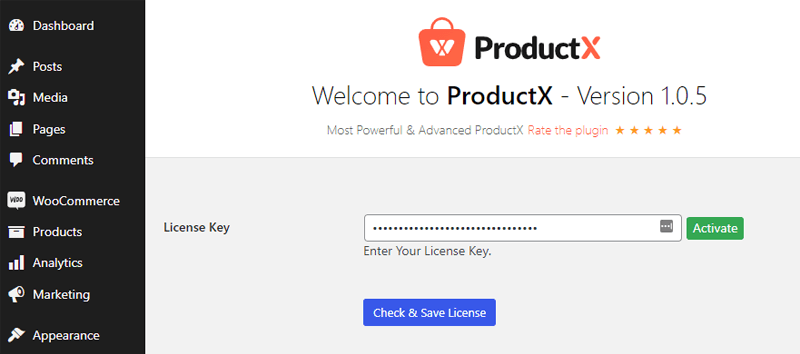
Also, don’t forget to configure your settings for your premium version in the same way you did for the free version.
Step 2: Creating WooCommerce Shop Page with ProductX
Now, you can use WooCommerce Shop Page with the ProductX plugin to create your custom WooCommerce product layout.
There are 3 approaches to this. The first method is to use the block design to build it from scratch. Whereas the second method is with the help of ProductX’s starter pack and the other way is to use the Builder Addon of ProductX.
Note that, you must first create and publish your products in various categories for your product page. However, there shouldn’t be a problem if you currently have a WooCommerce store up and running. Simply follow along as we guide you through the process.
Not to mention, you can import the demo products from WooCommerce to check out the plugin for the upcoming demonstration.
Let’s take a closer look at the methods!
Method 1: Create WooCommerce Shop Page from Scratch
Now, create a new WooCommerce custom product layout for your online store as soon as possible. To do so, go to the dashboard and click on the Pages>Add New option.

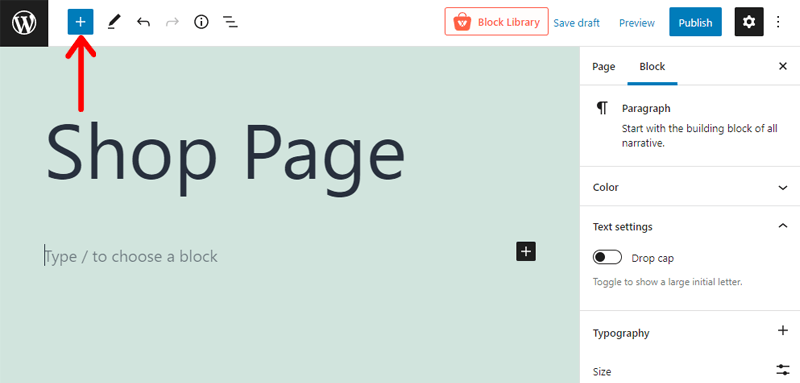
This will take you to the native Gutenberg editor in WordPress. Now, you need to “Add Title” to the page. For example, “Shop Page”. Then you can add other blocks as needed.
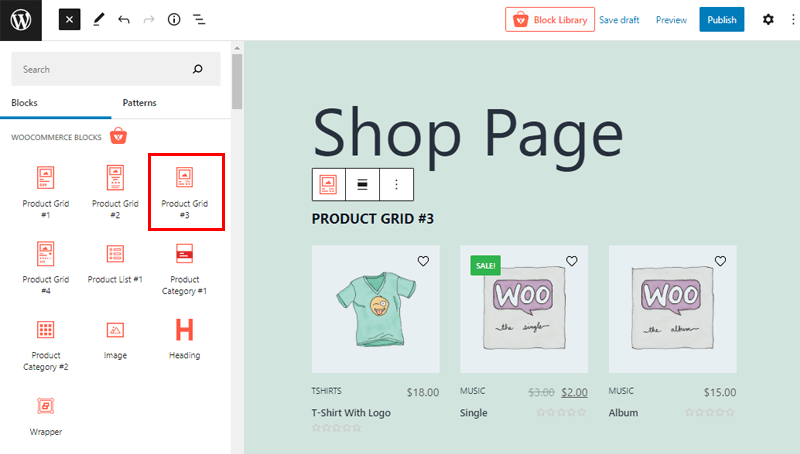
Now, click the + icon to access all of its product blocks. Following that, you’ll have access to numerous blocks of the ProductX plugin for the WooCommerce store.
All you’ve to do is select one of the available block Grid options. We have chosen the ProductGrid#3 option in this case. Now, on the right, you can view the selected product grid.
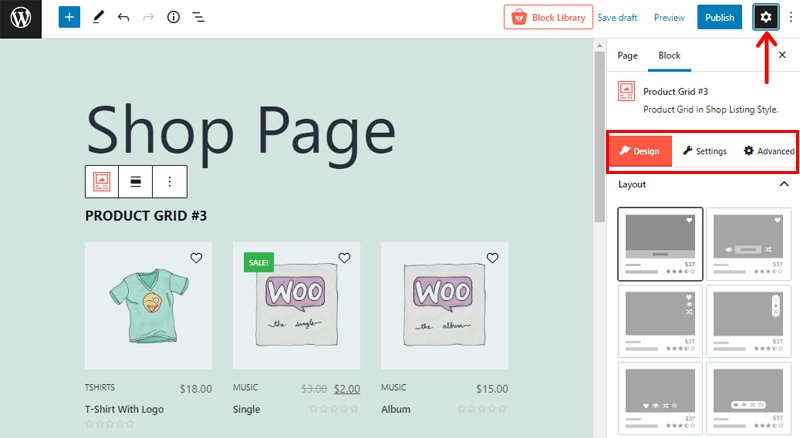
In addition, you can now change the block’s other settings. To do so, first, choose the block you want to customize. Now, go to the upper right corner and click the Settings icon.
There are three customization options: Design, Settings, and Advanced. We can then twist and change every element of your product page to your choice.
We’ll go over the customization options in more detail in the upcoming steps.
Method 2: Import the Starter Pack Template to Create WooCommerce Shop Page
As previously stated, ProductX offers a variety of starter pack templates for a new shop page layout. You won’t have to start from scratch this way, and you’ll save a lot of time.
Just like before, create a new WooCommerce custom product layout by exploring the Pages>Add New.
Simply, give a suitable title. And, at the top, you can find the Block Library option. Select it by clicking on it.

Then, there opens up stunning starter packs and ready-made block designs. This is further divided into two categories: free and premium.
For the time being, we’ll solely focus on the Starter Packs section. You’ve complete control over which one you use for your shop page.
Just select the Live Preview button of the chosen template. Then, you can click on the Import button to import the template.
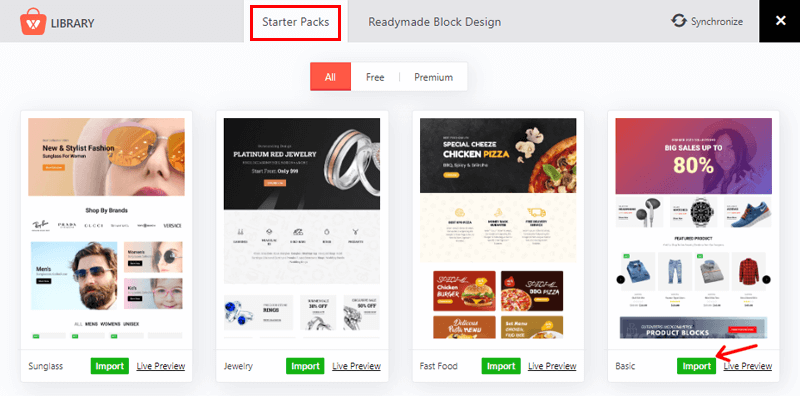
After that, your selected template will appear in the editor within a few moments.
Now, you can quickly make all of the necessary changes to the imported layout from the block editor on the left side. After that, select the Preview button to have a better sense of how your shop page will appear.
That concludes our discussion. By selecting the Save draft button, you can now save your work up to this point.

Finally, to publish your shop page, click on the Publish button.
Method 3: Use Builder Addon to Create WooCommerce Shop Page
You can use the ProductX Page Builder Addon to generate single product pages or product archive pages based on your need. Also, after creating a single product page template, you can use it across several pages, and even define conditions for use.
Now, let’s jump into the steps to create a single product page with the Builder addon.
Bear in mind that the Builder addon feature is only available for the ProductX Pro users. So make sure to have a pro license. And, follow the steps we’ve mentioned earlier to activate your pro version.
At this moment, go to the WordPress dashboard, and click on the ProductX>Addons. Then, you’ll find several addons from which you need to look for Builder Addon. Once you’ve found the Builder addon, enable that addon.
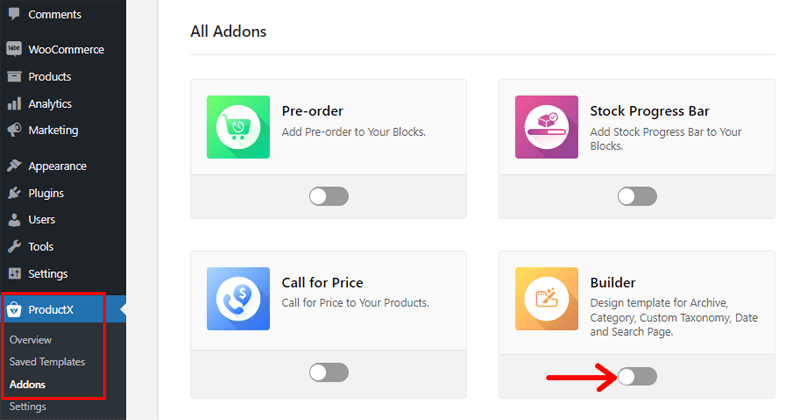
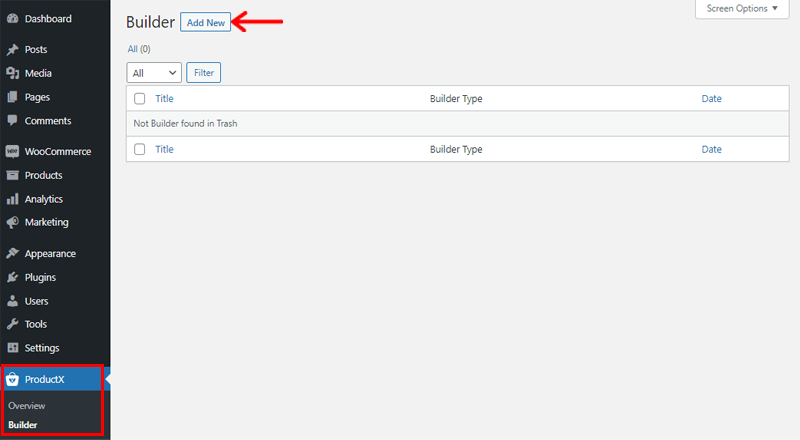
After that, you can see a Builder option under the ProductX menu. Now, click on the Builder menu and go to the Add New button to create a new template layout.
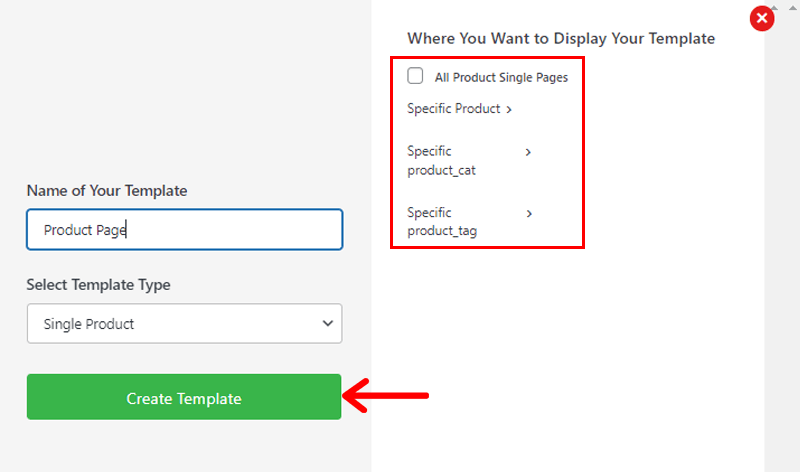
Then, you’ll need to fill in the details of the Name of Your Template and Select Template Type. Currently, it offers 3 templates: single product, product archive, or shop. You can select any of them as per your need.
Next, you must decide where you want to display your template. On the right side, you can see different options:
- All Product Single Pages
- Based on Specific Product
- Based on Specific product_cart
- Based on Specific product_tag
Also, these options may vary on the basis of the template type you’ve selected.
So here, we’ll enable the All Product Single Pages option. After that, click on the Create Template button. Once you’re done, you’ll be prompted to the Save & Edit Template button. So, simply click on it.
Now, you’ll be redirected to the page editor. Once you’re on the page editor, click on the + icon which is located on the left side. There, you need to scroll down and browse the Single Product. After that, you can find the 14 Single Product blocks.
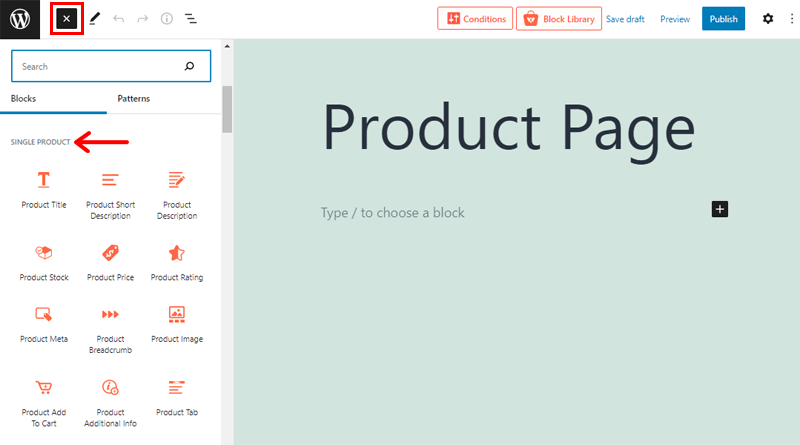
Further, you can use the blocks for products like Title, Short Description, Stock, Price, Product Review, Add to Cart, etc.
Along with that, you can customize the design for each block. And, the design of each block comes with Style and Advanced design elements. However, the options to customize each design elements differ according to the block selected.
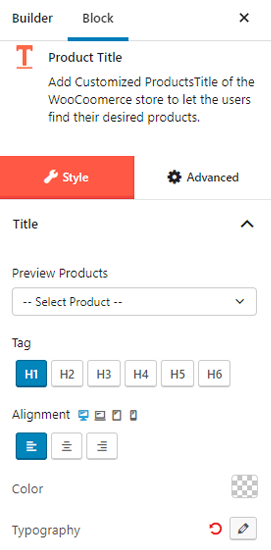
So, this is how simply you can create your product layout using the Builder Addon.
Step 3: Customizing the Shop Page using ProductX Blocks
In this round, let’s take a closer look at the customization options of the shop page we just created.
For that, select a block you want to customize. And, on the left side, you’ll see 3 different customization options: Design, Settings, and Advanced. We’ll explore these options individually for you.
1. Design
In this section, you’ll get 3 different elements to customize: Layout, Design, and Advanced.
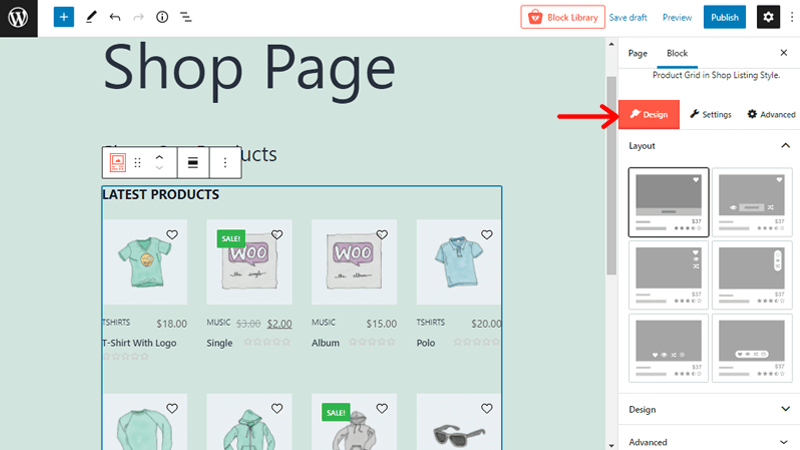
- Layout: It comes with several layouts for the block design that you can easily change for the selected block. Here, we’ve selected the second layout as you can see in the editor section. Also, you can select anyone and see the changes to your product block.
- Design: This section includes a few of the block design options that you might want to import. All you need to do is hover on the design and click on the Import option. You can just explore them or leave them simply if you are fine with the current design.
- Advanced: This option is basically for tech-friendly users where you can add additional CSS for product design.
2. Settings
This customization option comes with a huge number of elements that you can twist and tweak for your product block.
Some of its common elements that you can customize are heading, title, meta, category, image, cart, sales, and more.
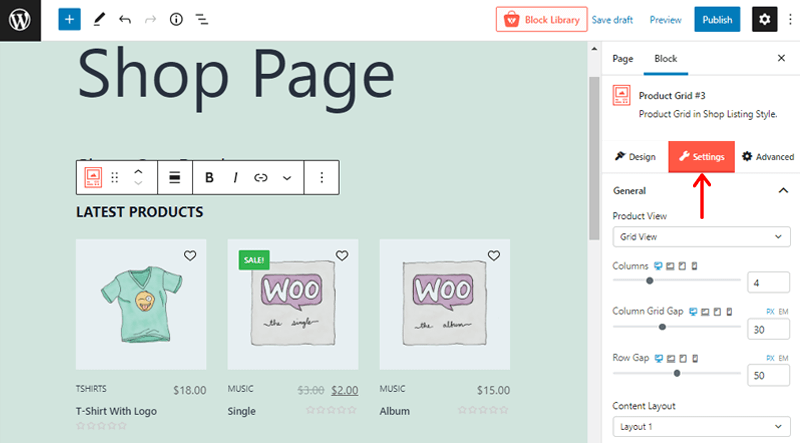
Besides that, let’s look at a few crucial options:
General
It comes with the general settings of the product layout such as selecting the option for Product View and adjusting the Column, Column Grid Gap, and Row gap. Also, enable/disable different elements of Content Layout like show cart, wish list, quick view, compare, sale, etc.
Query
It allows you to showcase your products based on specific parameters. Here, you can select options for Quick Query, Number of Post, Product Status, Category, Order By. Also, you can enable/disable Exclude Out of Stock, and Include Product or Exclude Product.
Overlay Meta Elements
This field helps to improve the looks and appearance of your product blocks. Here, you can customize the color, background color, border, border radius, box-shadow, spacer, padding, and so on.
3. Advanced
This section comes with 4 different elements to customize: General, Responsive, Custom CSS, and Advanced.
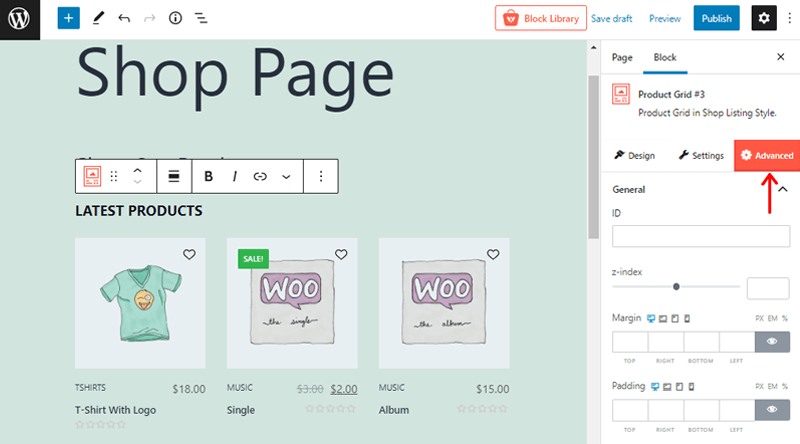
- General: You can enter ID, z-index, and customize the margin, and padding. Also, you can change the background, border, boxshadow, border radius, and so on.
- Responsive: Here, you can choose how to display the product blocks in different screen widths. Such as on desktop, tablet, and mobile devices.
- Custom CSS: Also, you can enter your own custom CSS in this text field.
- Advanced: This option lets add the additional CSS classes for your product block.
That’s all there is to customize your product block.
Step 4: Preview the Shop Page
Lastly, we have attached a snapshot of the Shop Page that we created using the ProductX plugin.
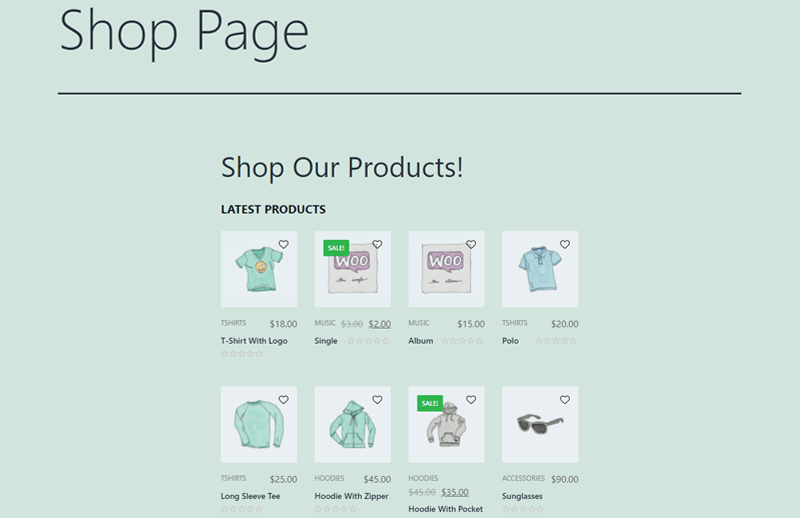
Isn’t it amazing how quickly your product layout is up and running?
Therefore, you can swiftly comprehend and construct your product page by following these simple steps.
Conclusion
Hence, this is all about a tutorial session that helps to create your own awesome and beautiful product layout.
We hope you found this article helpful in creating a WooCommerce custom product layout on your WordPress website. If you haven’t tried it yet, then you definitely should!
With such simple steps, you can instantly understand and create your custom WooCommerce product layouts using the ProductX plugin.
Do you need any help regarding this post? If yes, then feel free to drop your comments below. And, we’ll guide you with easy steps.
If you like this article, then don’t forget to check our recent articles on the best WordPress login customizer plugin you should try & PostX review.
Also, follow us on Facebook and Twitter for similar types of content.


